


 Photography: Ruth Eileen Photography
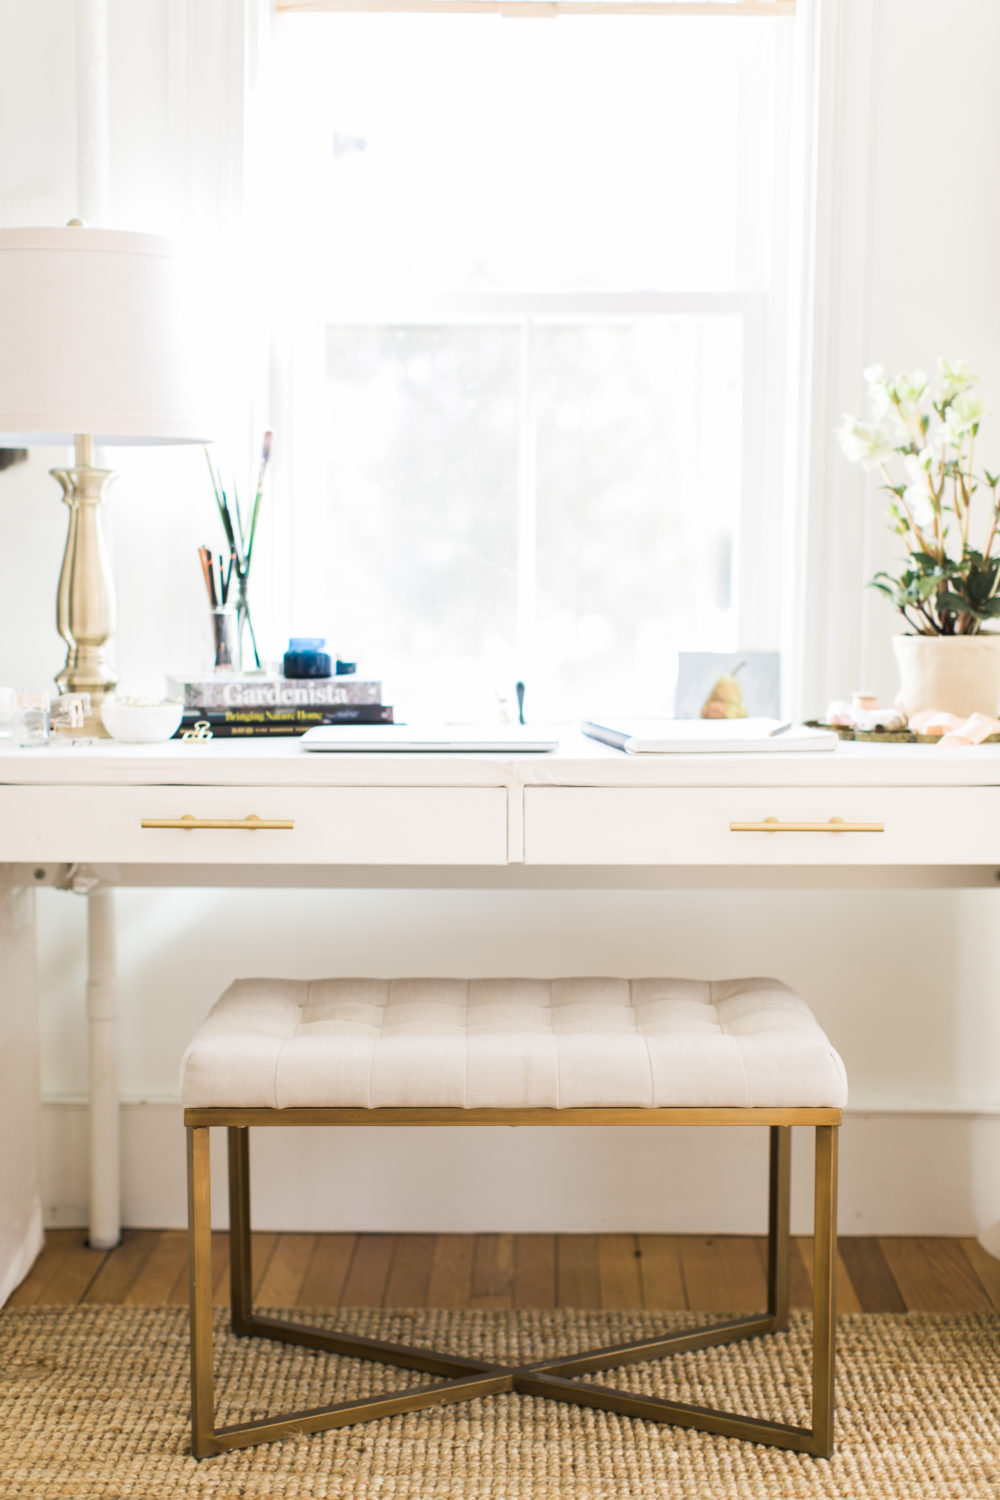
Now, I’ll be the first to admit that unless they’re super simple, I neither have the patience nor the talent to DIY much of anything, let alone an Ikea desk hack. Don’t get me wrong – I’m quite confident in my abilities in the creative department, but I’m very much an advocate of knowing where said skill-set lies and then staying in my lane. But my friend Jess? Well she’s a master at ALL of the things. For real – all of them. The woman is incredible, and I’m certain that everything she touches turns to gold.
We actually worked closely together years ago at SMP Living, and I’ve had the pleasure of seeing her in action first hand time and time again. So when she picked up this super inexpensive Ikea desk for her studio, and then proceeded to wrap it in linen to bring it to next-level status, I was equally impressed (per usual), as I was jealous of her creativity (per usual – ha!). The results look rich and luxurious, and you’d never know it’s an Ikea desk hack – which is exactly what you want from an Ikea desk hack (am I right!?) It turns out, it’s simple enough that it’s something I feel even I could do, and I’ve asked her to share her step by step guide below – to which she kindly obliged (thanks, Jess!)
Note: if you do tackle this bad boy, please share on Instagram using #LarkandLinenDIY – I’d love to take a peek at your results


SUPPLIES
Ikea MICKE desk
2 1/2 yards cotton or linen fabric
2 sheets of foamboard
Packing tape
Mod podge
2 gold t-bar handles
Large foam paintbrush
Disposable plate
Scissors
Utility knife or exacto knife
Fabric measuring tape
Yardstick
Drill
Drill bit (matching or slightly larger than the size of the screws for your drawer pulls, ours was ⅜”)
Iron
INSTRUCTIONS
1) Assembly the desk according to Ikea’s instructions. Leave the drawers out for the moment.
2) Cut 2 pieces of foamcore to fit the shape inside the open metal legs on the left side of the desk. I cut a large rectangle that was roughly the size, then traced the curved areas with a pencil and cut those out after.
3) Tape the foamcore inside the left desk legs, so that they are as flush as possible with the legs.
4) Mark the drawer fronts where the screws will need to go for the handle to be centered on each drawer. Drill a hole at each pencil mark.
5) Iron the fabric to remove any wrinkles.
6) Pour some mod podge on the disposable plate and brush it on the right leg of the desk. Gently press on the fabric and adjust it until it is even with the lines of the leg. Lift up the unglued portion of fabric and spread mod podge underneath. Lay down fabric and smooth out any air bubbles and press into place. Keep going section by section until the entire leg is wrapped. You may have to make some cuts as you wrap under the desktop as the height changes under the desk. Trim any excess fabric.
7) Repeat step #5 on the left leg.
8) Cut pieces of fabric to be slightly larger than the desk drawers (about a 1/2 inch on all sides). Brush mod podge onto front of desk drawers and gently press on fabric pieces and smooth out air bubbles. Wrap the excess around the sides of the drawer fronts, cut at the corners so they can fold evenly, and mod podge in place. Cut a small x at the screw holes for the handles.
9) Cut a thin strip of fabric the size of the rim of the desk top. Use mod podge to cover that top section, as well as the thin vertical section between the drawers.
10) Install the handles in the drawer fronts and put the drawers into the desk.
11) I chose not to cover the desk top so I can keep it clean more easily, but if you work mostly on your computer, you may want to cover the desk top with fabric as well for a more even look.![]()
Ikea Hack: Jess Blazejewski | Photography: Ruth Eileen Photography
filed in /


I would love to know where the stool is from? Suits it perfectly.
Hi Nicole! The stool is from Target, maybe a year or two ago? Not sure if they still have it :) xo Jess
Thanks for the reply Jess, I am sure if I searched, I could find something similar at Homesense.
Very pretty!! xoxo
The photos are so ‘light’ there’s almost no definition, so I can’t really see the effect at all. Not sure why, as the previous comments seem to be able to see it well enough to send a compliment. I read the instructions, just to see if I could visualize the look – not doing it for me though. Can I look at it somewhere else?
Unfortunately, I have to agree with Linda. I read the instructions, looked closely at the pictures and still don’t see the DYI Hack. If it weren’t for the very slight puckering above the drawers, I would have no idea from the pictures that something was modified on the desk. Would love to see some detail shots or pictures with more contrast :)
Hi Linda,
Sorry it’s not clear for you! If you take a look at the original desk http://www.ikea.com/us/en/catalog/products/90214308/, you’ll see that it came with one hollow leg that I filled in, then wrapped the desk with a light ivory linen so it felt more luxe than the laminate. I also added gold handles :) Hope that helps!
xo Jess
This is so gorgeous and just what I need for my little apartment office nook. Loving your site/instagram/pinterest btw! -Mere
Thank you so much, Meredith!
Agree, see no difference….also sounds as if you do something to one side of desk with foam core but not other? Very confusing, directions and photos useless
The handles really did make the difference. I realized that after seeing the original furniture at IKEA’s site. The colour is slightly pinkish?
Thank you.
it definitely adds some much needed warmth for sure!
[…] han gustado, me chifla ver como un mueble se transforma en algo completamente distinto, puedes ver uno nuevo […]
[…] Jacquelyn Clark of lark and linen is also a big fan of ikea office hacks Her friend and go-to DIY-er Jess Blazejewski created a next-level workstation by covering a standard desk in linen. Get the full how-to for the project here. […]
“I nor have the patience…” Oh my, please fix that and pick up a grammar guide somewhere. It hurts just to read that.
Thanks for the heads up! It’s been fixed. I’m an “artist”, not a writer, and know that my grammar is nowhere near perfect. I appreciate your constructive criticism – I learned something today.